One of the things I particularly like about Bryan Peterson (the guru on exposure) is his easy to understand explanation on how to get the most out of your camera and lighting. I find his method really easy to understand and follow. For those who like me find visual instructions easier to follow check out Bryan's stuff on You Tube.
You see it all the time – an arena filled with fans, the stars take to the stage and across all levels of the stadium, little pops of white light sparkle as people point their cameras toward the stage and shoot. Hundreds of people all end up with the same shot – a dimly lit stage in the distance and the perfectly exposed bald spot of the guy in the next row down. Not what you had in mind? To understand your digital camera's flash and what it is capable of, we need to talk about flash basics.

On-camera flash used with window light from the left side. So as not to become the main component of exposure, the on-camera flash was set to fire at -1 1/3 stops down from what the camera thought it should be. The reduced flash output provides some fill light to the face which would otherwise have gone to dark shadows had it only been lit from the window light.
Unless you are shooting with a true professional-level workhorse DSLR, your camera probably has a built-in flash. You may have even purchased an accessory hot-shoe mounted flash (or strobe, or speedlight – same thing). Camera manufacturers have made using flashes so automated that you'd think you wouldn't need to know anything about them – just turn them on and shoot. Well the problem is, even though there is a computer controlling the flash, somebody had to program the computer and like it or not, they cannot truly predict exactly what it is you are photographing nor can they predict how you want the photo to look. You have to wrestle some control away from the camera's brain and use your own to make some decisions. Relax, it's easy and if you invest some time experimenting you'll soon be able to achieve the look you want using flash.
Remember that the picture which the sensor on a digital camera delivers to your LCD or computer screen is composed of three key elements that determine the overall exposure (how light or dark the picture is):
1. How much light gets let in through the lens – Aperture
2. How long that light gets to hit the sensor – Shutter speed
3. How sensitive an ISO you have set
Using a flash during exposure adds a new element – a very short burst of light, usually effective only within close range, that lasts for somewhere 1/1000 sec to well under 1/30,000 sec. The flash can contribute some light to the overall exposure based on aperture and shutter speed, or it can provide ALL the light for an exposure if the aperture and shutter speed selected won't allow enough background light to hit and be registered by the sensor.
When do you need to use a flash?
There are no rules - a flash can be used anytime, and the more you understand how it relates to the exposure, the more creative and effective you can be with it.
You might use flash indoors or out when ambient light levels are low – the brief burst of light will help freeze subject movement and stop the blur from camera shake. You might use flash to illuminate the otherwise silhouetted subject of a portrait taken against the background of a radiant sunset. You might use flash at high noon on a sunny day to ease some of the dark and distracting shadows created under a person's nose, eyebrows and chin. And if you are close enough, say in the first row or two, you might use the short duration of flash to freeze your favorite musician as she windmills around the stage.
In any of these situations, simply popping up your built-in flash or popping on your accessory flash will likely give you fairly decent automated exposures. But to take your photos beyond an automated snapshot aesthetic you will need to do some experimenting.
Try This:
Get ready to waste some pixels playing around with some variables that you can set on your camera.
First make sure that you have not set your camera in ‘idiot-mode’ - the one where the camera decides when to pop up your flash by itself and restricts your ability to change settings. Start with P or A modes for best results.
You'll need to familiarize yourself with your camera and/or manual to be able understand the following:
1. Know how to dial in Exposure Compensation (+/- EV) to influence your camera to take a brighter or darker picture from what it thinks the picture should be.
2. Know how to dial in separate Flash Exposure Compensation (+/- EV) for the flash itself.
3. Know how to set your flash to fire in Slow-Sync mode.
Time to play...
Set your subject (human, statue, cooperative pet, flower...) within several feet of your camera – the further away from the camera the less effective the flash will be. (Remember the bald guy's head and the little dark speck of a performer on stage?)
Begin by taking a normal exposure without flash. Notice what you see and how the subject is exposed.
Now set your flash to fire and shoot another picture with the same composition. How has the light on your subject changed?
Begin playing with the Flash Compensation control. Take shots with the flash successively dialed down in -1/3 EV steps. Don't change anything else, but do examine how decreasing the flash's output changes the nature and intensity of the light on your subject. Now take shots with the flash cranked up toward +1 EV – what does that do?
Next, convince your subject to hang around a little more... Reset your flash compensation to 0 and begin dialing down (-EV) the camera's exposure. What starts happening to the background? Dial it down some more – sunsets take on a deeper glow, background lighting becomes darker and ethereal, daytime skies take on a new character. Now begin a series of shots where you dial UP (+EV) the exposure – notice what starts to happen.
Finally start making combinations of up/down EV for the exposure combined with up/down EV adjustments for the flash.
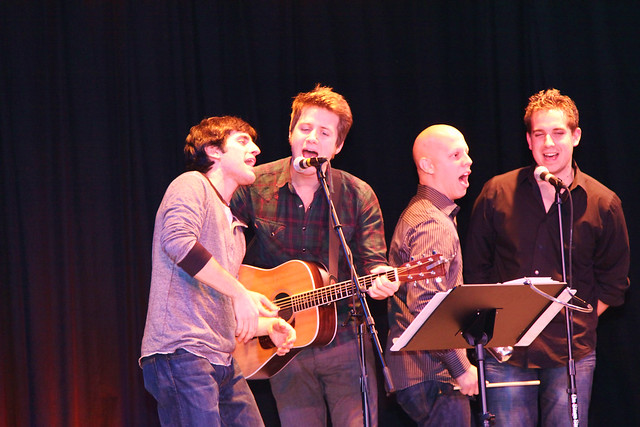
Setting the camera's flash to Slow-Sync mode encourages the camera to leave the shutter open a little longer during a flash exposure. The flash illuminates the performers while the slower shutter speed allows the ambient light from the tent ceiling to create a dynamic background.
TIP: If you are shooting in one of your camera's automatic modes and the background stays consistently dark no matter where you set your EV compensation, you may need to engage slow-sync mode. Without Slow-Sync set, your camera is probably restricting you to a minimum shutter speed of 1/60 second, which may not be long enough in darker situations to adequately expose the background. Slow-Sync allows the camera to select longer shutter speeds – at the risk of blurred backgrounds - which, depending on your desired outcome, can be a very desirable effect.
TIP: If you are shooting in one of your camera's automatic modes and the background stays consistently dark no matter where you set your EV compensation, you may need to engage slow-sync mode. Without Slow-Sync set, your camera is probably restricting you to a minimum shutter speed of 1/60 second, which may not be long enough in darker situations to adequately expose the background. Slow-Sync allows the camera to select longer shutter speeds – at the risk of blurred backgrounds - which, depending on your desired outcome, can be a very desirable effect.

If you really play with your camera's settings you can get some dynamic effects. Although the sky was not nearly this dark in reality, dialing in -3 EV for the general exposure made the background go rich and dark. Cranking the flash up to +1 at the same time allowed the grasses near the camera to be illuminated in strong contrast to the background
Great overall review of exposure.... Well written and appreciate your photos illustrating your post. I look forward to more!
ReplyDelete